Create a player controller to test the AI and showcase Jack's animations and effects
Basically our animator and vfx guy had a lot of stuff that didn't make it into the game due to some problems with the main character controller. So I decieded to spend an evening setting up a completely new character controller. I used the ethan animator tree then added Jack's attack and spell animations to it. With a modified golem health script to act as the players and an entire input script that calls different spells. I'm surprised how quickly I was able to do this and whilst its buggy this is code done in 4-5 hours. I will come back to this after and set up a fully working non buggy controller that can be used in my next game. I was very happy with this though. And so was Jack who appreciated being able to showcase his work.
Task
Redo all scripts and then sort out the navmeshagent to animator movement.
Step One - NonMovement Scripts
This stage was just refactor of all non-movement code. And resetup of the animator to allow combat and idle animations to be called. Comments and redundant code were mostly removed and better bools setup.
Golem Animator
Step Two - Movement and Animation
This stage was the hardest part. I basically wanted to get the charge working with the navmesh and animator. So I decided to set up an entirely new script that would control the animation values taken from the nav. I found I also had to turn this off at certain points to stop he golem going to far. This is less than ideal but it works. I shall have to develop this further after this project. But for now it works and enables gameplay.
Final Steps and Thoughts
The final setup was to get the the new nav values working with the search and other functions. These didn't take too long to set up. The AI is now working great. All parts are doing as they should and i'm impressed with where I am from where I started. This last iteration is so much better than the first. And whilst there are many areas I could improve upon that is only because I have learnt more whilst doing this first setup. I plan to take this AI and recode it again to work in my third year final game. The AI setup took a lot longer than I thought but i'm glad I did a last iteration to work out as many bugs as possible. And although I had to setup my own player scripts to test it I feel this is a strong set of code.
Create a set of sounds then call them at appropriate times within the golem script.
Step One - Dehumaniser - ALL
The first thing that had to be done was the actual creation of sounds for the golem. I decided to book out the sound studios and produce the sounds using the dehumaniser software. Me Jack, Jamie and Matt all came in and recorded a set of sounds each this enables us to have a lot of sounds to chose from.
Step Two - Cutting - JACK
Jack then cut the different sound files choosing the best of each and creating a golem sound back for me to use. They were all cut down to specific grunts and roars with further development taken in regards to the pitch and volume. As many different experimentation had to be made in order to establish the sounds that would feel the most correct in regards to the golem.
Step Three - Scripting - JOHN
The final step of all this development is of course to set up a sound controller script. This script has many different elements to it and I shall discuss each section in its own instance.
Audio Source - The first section is to grab the audio listener that is upon the same object and thus be able to assign clips to it.
Array - Each sound section has an array to store all Idle/Alert/Death sounds within a set array.
A distance volume control - This section controls the volume dependent on distance. Using if statements to lerp the volume to 0 when distance is greater than 14 and to and 0.4 when under 11 but over 8. This system works really well controlling the sound just as needed.
Sound Assigning - For each state, Idle etc, a coroutine is present which calls a random int from the correct array. The Audio source is then turned on then turned off after a wait. And then a new random sound is assigned allowing a sense of variation.
Step Four - Footsteps - JOHN
The footsteps are slightly different all I've done is attached a new audio source with a single footstep sound. A trigger then turns this on when the fist touches the floor and then turns it off when the trigger is no longer touching. This is a simple solution and a better one most likely remains.
Thoughts
The sound system works really well however I feel like more clips are needed and more arrays that hold more passive sounds so as to really bring the golem into a better design.
Task
Code health and a diagetic emission health bar.
Step One - Setting up the materials
The first step was to take Tom's latest model and apply the materials and latest rig. This was a very quick script to set up.
Step Two - Accessing Emissions
Accessing the emission texture took more work than I thought to begin with. It turns out you have to actually call keywords to unlock the use of them. I had to refer to this API quite a lot in order to get it working. But once I did it was rather simple. I could now change the emission to be that of a set colour. I then decided to create a point light which would take its colour value from the emission and would have a pulse script on it. This made it feel more alive.
Step Three - Health
I then set up a health script which used cur-health and max-health. The current health could be accessed by a trigger which would lower the current health. I set this up to make use of the emssion. So as the golem's health falls its light changes.
180 - 121 -- Yellow
120 - 61 -- yellow/orange
60 - 41 -- orange/red
40 or less -- red
This allows a proper diagetic showing of the health. So the player can read what is happening in game.
Step Four - Death
Once that reaches 0 the golem activates a death animation and falls to the ground. Where it plays a death sound then is destroyed and a hollow armor is instantiated in place, made by jack. This was just instantiating and calling bools so a very simple script to make.
I wanted to try and push towards creating a cover AI script. One that would allow me to, with altering the golem scripts, set up the skulker. I was very confused on how to approach this to begin this and so had to look at many different videos to get some ideas.
I began to piece together the notion of using nodes to act as cover points and thus I began coding. Firstly I set up a main cover holder which would be the main body of cover. For example a wall or rock. I created a tag for these called "Cover". I then created a cover selector script on the AI test cube. What this script does is firstly create an array and store all objects tagged cover. I would want to change this to an area around the AI so the array would constantly be getting filled and emptied. However for now this will do. Using an InvokeRepeating function I force the AI to chose the closest piece of cover at any one point.
Under each cover game object are numerous child Nodes each node has a cover checker script on it. Each has a goodcover bool on it. This bool is turned off when a ray from the cover to the player is not obstructed and turned on when the node cannot see the player. The selector script then fills up a node array with the selected covers child objects, the nodes, and selects the closest node that cannot see the player and moves there. See video below.
Thoughts
This is a very buggy script that needs multiple iterations to work better with many different things needed to be taken into consideration. However I feel I must leave this script and function for now and fully focus on doing a final set of iterations for the golem and make that one as good as possible. However I believe I could come back to this and make a cover script that works much better.
To create an achievable level design. It has been established that the current level design is way too much work for the environment artist to do at this time.
Overview
Although for this project I am not a level designer I thought I should develop a level and get the environment artist started on it due to the simple fact that it needed to be done and it hadn't. I created one major room where a crystal and statues will be located. Upon interaction with the crystal the statues will activate into the golem AI basically creating a battle room. This would mean that even if this was the only room to get done we should still have gameplay as long as the other coders have finished their environmental code. I also included two other rooms and a corridor that can open as an end level area.
Import the low poly golem model and set it up to work with the AI scripts.
Stage One - Golem Model
Importing in the Golem was the easiest part our animator had already attached the rig to the model so when it came into unity it was all set up. The only element I had to change was to make the rig humanoid. I think in future custom rigs would be better specially for creatures however this was one of the first rigs our animator had done and it works really well.
Stage Two - Animation and Animator
Bringing in all the animations so I has access to them seemed like the logical first step. I had to change all the import settings to act on a human rig again and the import for movement animations to looping. I then had to create a custom blend tree. I used my original iteration of the ethan AI to work this out. However we didn't have as many animations as needed to create a smooth movement. I shall ask the animator of the group to create some shorter or even stationary turns. But the blend tree works really well for the first animated setup! In regard to the actual animator setup all I did was make the movement into the entry state and then the same bools from the the cube AI with a combat state which had no movement and the two attacks coming off that.
Stage Three - NavMeshAgent to Animation
The next step was to get the golem AI to use the animations in the level. To do this I have to try and take values from the nav and feed them into the animator. I have two floats currently within the animator which control the movement blend tree. Turn which is the x value, and Forward which is the z. I was really struggling with how to set this up. So with the tecaher's assistance we went with making each float equal to nav.velocity.x/z. Now whilst this works its rather buggy the AI spasms out quite a lot due to this and even has trouble stopping so I will have to research more into this and come back and develop a script just for this nav to animator conversion.
Create a sight system that allows peripheral vision.
Stage One - Initial Ideas
I spent a while before coding drawing and writing up diagrams like above trying to work out what kind of angles I needed and how I could approach the code. Researching into the unity API and forums I found out that degrees over 360 don't exist in world space. There are just 180 degrees on both side. So I need to cast out the angle comparison in the forward direction To force the AI to only raycast on the front facing side.
Stage Two - Raycasts
I decided to create a distance called raycast system rather than a collider based one. This means the sight doesn't require a bool to activate it just activates at different distances using if statements. Each if statement contains a cone of vision and a debug.ray of a different colour to allow me to test in the scene view when a certain part of the vision cone is being called. By giving larger widths of vision a smaller distance I can start giving the AI some peripheral like vision. I decided to create this script on a static test cube to just be able to see how the sight debugs changes, as seen at the start of this video. Once this was working correctly I put the new sight script onto the cube AI.
Thoughts
I think this script turned out really well. With a little bit of API raycast research I was able to set up an original functional script and get it calling the correct parts of the AI states. The extra cones of vision really help the AI seem more intelligent and reactive.
Firstly its been a while since i've posted basically an entire month! But thats not been a month in vain. Since the last iteration I have decided to do a complete new iteration of the code that I had and put on a moving cube. This is so as to just code the AI without animation so I can focus fully on the code and then move the working code to the golem model when ready.
General Script Iteration
I went through all the scripts mentioned previously within this blog and redid the code from scratch using the previous ones as reference. Mostly nothing was changed with just the few cleanups and the like. The patrol and the search stayed as the last iteration due to having already changed these two scripts to a higher level already.
Animator
Due to the model now being a cube, and no rig, I set up a completely new animator along with unity animation. I gave the model two hands that moved back and forth to show when the AI was moving and a second state that would stop them moving when in combat. The transition between the non-combat and combat states happen when a combat bool becomes true. I also implemented a punch and slam animation. These two movements were chosen due to the group asking for these two attacks. Again two bools are set up ready to call these. Setting up an animator has become an easy enough task for me now however I haven't touched layers yet. But a bit of research into layers via tutorials and the API have cleared this up and suggests the use of layer masks could be a good route to go depending on how the group wants the golem AI to work in combat.
Current AI animator
Combat Scripts
The AI has two attacks a punch, and a slam. With the slam being the more powerful one. Thus I wanted to make it more likely for the AI to use the punch rather than the slam. So I created an array of five ints from 1 to 5. Odd numbers would turn on the anim bool for the punch whilst even numbers would initiate the slam. The slam when called would then have a cooldown preventing it being called until the slam is ready again. This works rather well for an initial setup but again a second iteration of this is needed at least. I'm tempted to move this into coroutine like I did with the other scripts. In all honesty I should really be doing this straight away. But development is development after all. Furthermore the punches and slams do not have triggers for now as I still must wait for the player controller to be setup. I hope this is soon as testing with the rough one I set up is not how the game will actually play.
To update and fix the search function to work in a more logical manner.
Overview
Fixing the search function was the next most important area of code for now. I decided to approach this similarly as the patrol was done. Using coroutines that are called within the transitional states within the core state machine. By doing it like this I can again take the code through a step a time and only call the parts that are needed. Firstly the movement to the last sighting has to be completed first and I simply do this by calling a void for one frame that sets the nav.destination to the last sighting transform. Then the search routine is started. The corotuine cannot move through its next destination setter unless the AI is within a certain distance of its current destination. And before even this I call a Randon.range which tells the rotuine how many times to run before returning to patrolling. I feel this is a much more reliable way of timing the routine rather than a timer+1 per frame and also a less messy one. The new point is simply generated by a Random.range of z and x added to the current transform of the AI. This point is then fed into the nav.destination again. This repeats for the amount of time set in the initial time caller as mentioned earlier.
Search Code
Thoughts
This works a lot better than the original setup and whilst it takes a lot of code from the initial one it calls it in a more logical format and allows a better ease of control to a developer changing values. I am quite happy with how this code turned out and shall most likely leave this iteration as is for now.
Overhauling the patrol code was something I mentioned previously. Now as of the moment the patrol code is running as a simple void function. However the function updates itself upon reaching different destination and needed a wait time. So it made sense to bring the code out of a void function and into a coroutine. By doing this I have allowed the patrol to be called once and therefore allow the calling to travel through each component one at a time. This allows it to update only when necessary and provide a pause at the end for the AI to stand before carrying on its assigned path. Furthermore this means I can call the routine once from the TranstoNoAlert state and thus maintain minimal constant calls. This overhaul is a very strong iteration I feel and development is most likely not going to be required on this script as it is already rather well laid out.
To create an AI setup that allows it to Chase and Search for the player
Step One - Core State Machine
Before even thinking about setting up the functions needed for chasing and searching I first need to establish a method of calling them. Thinking back on my previous project I realized the appropriate way of controlling the calling of functions would be the state machine. I actually really like using these as they help isolate code segments and therefore isolate problems, if they may arise. Simply they help structure the code into manageable areas and allow the calling of them through states. Within this state machine I set up three main states, NoAlert, Amber, and Alert. And three transitional states, TransNoAlert, TransAmber, and TransAlert. The transitional states allow me to call and stop the appropriate sections of other code before moving into the core state. Setting up this state machine didn't actually take much time or research due to my experience with them in the previous game.
Core Switch function
Step Two - Alert State Machine
Next I had to set up a state machine that would control what the AI would do when alert. This state machine is called when the AI has sight of the player. The two states within here would be Combat and Chase. For now I will leave combat and start working on that after I have finished the intial movement codes. This is because I want to have everything else sorted so that I can devote my full attention to creating a combat script. This statemachine has the same switch mechanic as the core state with a change of what controls the state. Basically when this state is active i'm constantly calling a distance checker which keeps track of the distance between the player and this gameobject(the AI). Then by using an if statement I can compare the distance against a float of combat distance and say that if the distance is less than or equal to the combat distance to change to combat state. This just means that the ai will stop when close to the player and start chasing again when not.
Distance checker and playeractive
Sidenote PlayerActive
I was finding it tiresome to constantly having to create a gameobject to assign the player too or calling the player via a Find command as it was both repetative and messy. So I created a script called PlayerActive that stored public statics enabling me to call any static from there in any script. So I stored variables such as the player gameobject and rigidbody.
Step Three - Chase
Setting up the chase was actually really simple. A constant calling of the ChaseUpdate() function constantly setting the nav.destination to the transform of the player in question.
Chase Script
Step Four - Search
Creating the search was the hardest part of the setup of these so far. But nonetheless I was able to create a rough working search function. Firstly the search script launches from the core state machine once the AI loses sight of the player after having chased or been combat with them. Within the sight script I have stored a variable of personal lastsight for the AI and the nav.destination is set to this point in space. Once the AI has reached this point a random point is created in a sphere around the AI and a timer is started. Once the timer reaches a certain value the core state is told to return the AI to patrolling. Now while this works I find it to be both very buggy and very hacky. I think turning this into a corotuine would be a much better idea and instead of basing the point on a sphere basing it in a cone that is roughly aimed at the player. This would allow the AI to search in a much more sensible manner. However as a rough setup this works.
This video showcases the search along with a tester squad function that I decided to remove for now.
Thoughts
I would like to get this put into a game environment as soon as possible as it is important to test these mechanics. However we seem to have no player controller yet so I must continue testing using the standard one I have set up. Hopefully within the next week or so the player controller will be at a point that can be tested with the AI.
To create a sight script which allows the AI to recognize when the player is in sight.
Overview
To create this script I admit I took a lot from the stealth tutorial sight input. In fact is the exact same script modified. Using a collider to initialize the script and taking a slice of the collider to act as the cone of vision. This then turns on and off the playerinsight bool. This enables me to have a strong starting point to edit the code. The notion of vector3s along with angles towards the player have got me thinking about ways to set this up in a much better ways as this current setup has some vital flaws. For example the cone of vision is the only sight section so peripheral vision doesn't exist and the notion of a collider being dragged back and forth feels a tad outdated. But for now the code does the job and enables me to set up the statemachine and then chase/search scripts. Since this is such a temporary script I shall forgo sharing the script here, also because its available on the stealth site, however once i have researched into raycasts and angle finding much more I will present the newer sight model I have in mind.
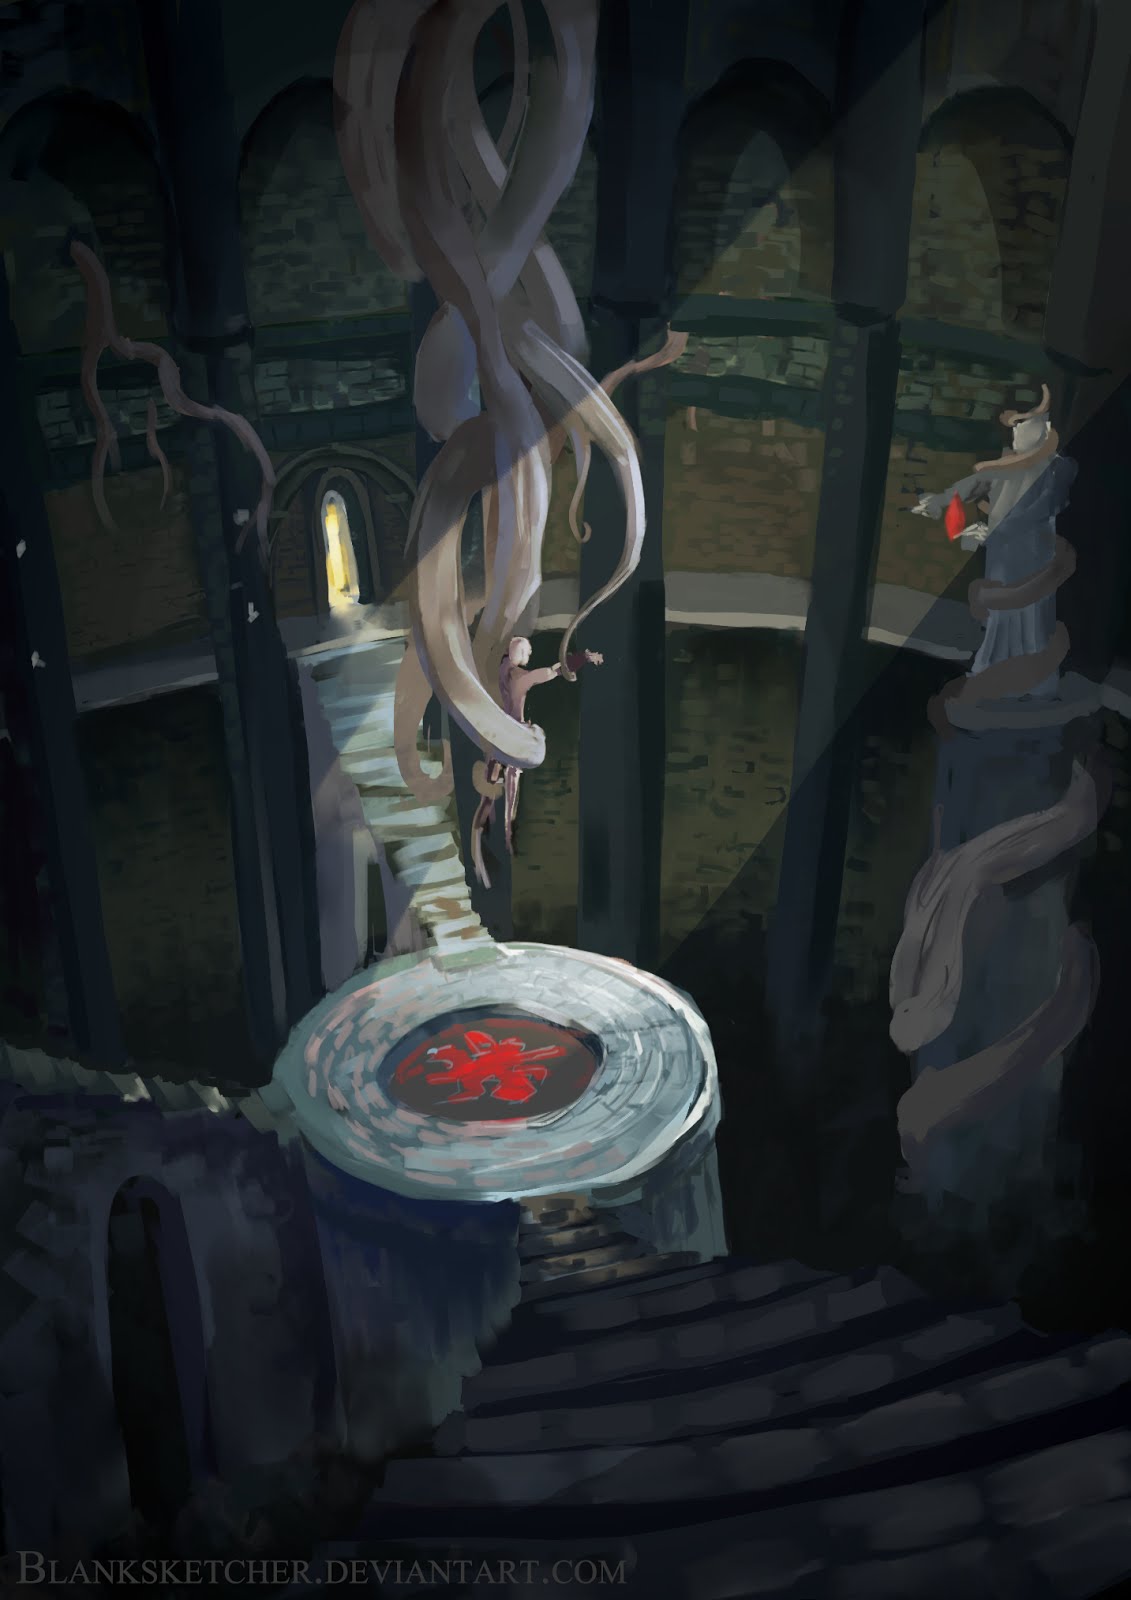
As it turned out I ended up having an additional concept task to finish before fully stopping concepting for this project. And that was to recreate a new design for the initial prison room. It appears the group has moved away from the whole idea of a root system breaking throughout the complex. I think this is actually a poor design choice as the roots were a unique element that prevent the environment just feeling like a generic dungeon. However as I am not the group leader I have let my thoughts be known and just decided to do as asked.
Image
The concept of the main room was to be him chained to the floor and I liked the idea of this being placed near a precipice or pit still as this helps highlight the prisoners importance. I went towards a very green colour scheme trying to get a magical feel. This was further attempted by the shards of floating crystal which, as mentioned in previous posts, are what bind his powers. I couldn't resist adding a root system in along the pillar so as to try break up the similarity of the piece. I tried forcing the perspective lines inwards. However i'm not entirely sure it worked, specially on the front collums.
The first element of AI I needed to setup was the patrol system.
Stage One - Animator
The first thing that needed to be setup before even beginning the patrol code was that of an actual AI itself. So I decided to take the ethan model from standard assets along with its animations. However I did not take the animator itself. I decided that if I am to setup a custom animator for the AI later I first must learn how to do so. To learn this I decided to follow the setup stages of the unity Stealth tutorial series, available here, this allowed me to create the animator myself but also make sure I was doing it in the correct manner. However I did avoid using Hash IDs as they have now become redundant in the newer unity version. Eventually I ended up with a working and functional blend tree for movement for the AI.
Stage Two - Patrolling
Naturally the next step was to begin the patrol code. I began with the idea that setting the NavmeshAgent(nav) destination would be the main way of developing this movement. By storing waypoints within a transform array I was able to set it so that upon reaching the nav.destination the waypoint index would go up by one, or if at end of array reset to start, and thus set the destination to the next waypoint. This system allows multiple waypoints from as little as two to as many as needed. Again the stealth tutorial was a lot of help for starting this. I also found out how to apply icons to empty gameobjects as gizmos. Which enables me to see objects without a renderer in the scene view.
Video
Thoughts
The patrol works as intended but I believe it can be redone in a much cleaner and better format. However the learning of arrays is a valuable tool and one that can be applied to multiple areas of this project. I shall revisit this patrol over the coming week or two and get it working in a better fashion.
I decided to create a proper presentation reel for the first milestone. I believe just talking about our ideas in a non-presented format would both be unprofessional and lead to misunderstandings. I simply used prezi and just set everyone's work up so as to be as easily viewed as possible.
Link - https://prezi.com/kbhmrkyt0bns/team-chest-arm/
In regard to my area of work I got a lot of input and feedback from the reception of this presentation. Concept art wise the notion arose from feedback that I need to work more on my perspective and placement which is completely correct. And in terms of the future code parts the choice of developing one for now seems to be accepted. However it was suggested to just develop it to work before adding major functionality which makes sense.
My role within the group has now been changed to become a coder rather than a concept artist. And although I would prefer to have stayed as a pure concept artist the call has been made by the lead. I've been assigned one major area to code. That of the Artificial Intelligence (AI).
Overview
In regards to the AI I have been writing up and developing some initial ideas. The first stage of which was to decide the different types of AI. This means working initial combat setups and the required behavior.
Golem
Close combat
High Health
Searches
Archer
Ranged
Seeks cover
Weak
Skulker
Close combat
Low Health
Flocks
Each of these will have a unique feel and function to them. And as such will have varying degrees of complexity to them. Now I haven't actually developed AI before and thus this project will be a new challenge for me. And due to this being an initial try and the fact that the group wanted it more I shall be focusing on getting the golem AI done first and then moving on to others if time permits.
Plan
The golem AI has a few major parts to it, listed below, and as such a plan of action must be made. Working out how to approach the code and which area to start with first. After a while of consideration, with many sketched flow charts, I have come to the following list of needed elements.
Patrol
Sight
Search
Combat
Animator
However i'm sure as time develops this list of 5 elements will become much larger as I'm forced to revamp different areas or add extra elements. Yet these core elements are the most needed for now. I look forward to this challenge.
Research
Moving into this topic I have had to research a lot of different sections. Firstly the general feel of the AI should work like that within Guild Wars 1(GW1). The enemy will react to an input, sight for mine proximity for GW1, and then proceed to chase the player until a condition is met. I believe a sight system for this would work better than the chase till distance reached that resides in GW1. This is because our level will be quite small and adding a distance chase would feel awkward. However being able to lose the enemy by dodging out of sight will allow us to keep a smaller level as well as adding the additional gameplay of sneaking around the sight radius. The unity forums and reddit will be a great asset for helping developing this as well as the unity Stealth tutorial from which i'll establish the first setup and code snippets.
My final concept task was one I assigned to myself. The current creatures were all very humanoid and I wanted to try create an interesting variation of an enemy. This enemy would also act very differently to the Golem and Archer types the other two enemy types will be.
Concept
The idea I came up with in the end was roughly based on insectoid-humanoid mergers. I wanted to create a creature that would sneak around and be rather close to the floor. Something that would use cover to group up and then swarm the enemy, thus whilst being weak individually as a whole they become dangerous. The design itself was made to be very dark so as to blend into the many shadows of the dungeon with a metal carapace that reflects the glow of its gems. They crawl on their stomachs dragging themselves with their claws. Their attacks are leaping like and try and drag the intended victim to the floor.
The next environment I was asked to design was a corridor that held a crystal of some sort at the end. This crystal would be one of the ones that gives the player a power. And so has to look important enough to draw the players attention quite easily.
The Image
The first idea I had before even starting the piece was to again try experimenting with perspective. And as can be seen from the image I went for a 3/4 view from above with a slight fish-eye lens effect. I tried to go for a very dramatic colour scheme with lots of reds so to contract with the usual greys/purples so as to attract the players attention more. The crystal itself I split into 4 so as to have the option of animating around each other so as to again highlight its importance to the player. The painting of the images itself was interesting as I was messing around with colours but wanting to keep it rough still. I believe this worked for the floor but had lesser success on the far walls. As a design concept itself I think I needed more development to flesh out this idea and give it a more unique feel. But sadly I have been informed by the group that after the next creature concept I am to become the AI coder. So I must leave this development to the main concept artist.
Intro
As my initial role within the group has been designated as a concept artist I have begun to piece together some environment ideas so as to have some concepts ready for when the environment artist has finished their level designs.
Overview
In regards to the first room I have been given by the group some general key themes. Firstly it is to be an underground wizard holding area. With roots coming through the walls and a general feel of disarray and unnaturalness. Basically a blend of a classic dungeon with more magical elements too it.
Stage One
The first concept I came up with is the one above. The idea of the roots holding a crystal/rock prison in which the main character is imprisoned in. I wanted to portray a large space as well as getting some architecture and potential game routes shown. The colours are very cold as I was trying to get a dingy feel to it. However the perspective felt too stiff and the room not extravagant enough for the purpose of the room itself, as it is meant to hold a powerful wizard. So I decided to leave this concept as it is for now and move on to another idea.
Stage Two
Within this second image I wanted to try a more minimal approach to the prison structure itself. I approached this concept with the notion of a giant root system acting as the bars of the prison itself. I then included two crystal braziers as a means of holding his power back. This is because the group has decided that the player gains his powers back by retrieving them from crystals. This meant a portrayal within the starting area might help the player understand their importance rather than just saying "hey heres a crystal you now have a power". The colours of this image feel a bit more successful than the previous one and the design itself feels quite interesting with the crossroad notion. However this concept must be halted as the group as a whole have decided that they would rather a statue be within a room such as this rather than a prison. So whilst this idea may be developed further along in regards to another room. For now I must develop a newer concept.
Stage Three
The final stage. In the end the group decided to go with something similar to this last concept. I tried to take elements from the two previous concepts. The hanging roots from the first and the crossroad/pit idea from the second. I then introduced the notion of a statue as mentioned above and made that hold the crystal that would drain his powers. I tried to experiment with the perspective a lot more within this image. I find that I tend to create very static and side on environments. And whilst i believe the attempt was not in vain. I feel it could be a lot better. And that I should take much more time on construction lines rather than trying to fix these elements within the painting phase, However the idea as a whole I am quite fond of. It sets the scene and feels dramatic enough to have a sense of importance. The idea of ascending out by having to climb the stairs helps provide the notion that this prisoner was supposed to be long forgotten and buried.